
Welcome to Teacher Thursdays!
🔰 Minimum Gear Requirements – Learner Signups 🔰
As Ironmen a lot of the wiki gear requirements and guides you read will cater to the best way for a main to spread out their gp. My goal here is to provide screenshots of the minimum gear I would prefer you to show up with as a learner to the raids we teach. These raids are all doable with less, but usually at the expense of your team. I will list as many sidegrades and downgrades as I can think of, and if you have any questions about gear feel free to DM the teacher of the raid you would like to join for any exceptions. For now, I will not be listing the best setups or any upgrades to these sets. If your gear is better, bring it. For most of these, the most important things will be:
• Your main-hand weapon
• Your stats
• Your defensive spec reduction weapon
I will also list some hard to find/misunderstood information about drop rate mechanics, and defence reduction.
🐐 Chambers of Xeric 🐐
This setup is aimed towards completing the new CM layout normal chambers. These contain every possible room in chambers so we can teach all of them in the same raid.
MAIN REQUIREMENTS:
• Dragon warhammer/BGS
• Charged Magic Weapon for Olm hand
• Your best Ranged DPS
•Your best STR gear + Melee weapon
• Thralls
• 90+ Att/Str/Def/Range/Mage
• 78 Herblore
EXAMPLE LEARNER GEAR SETUP:
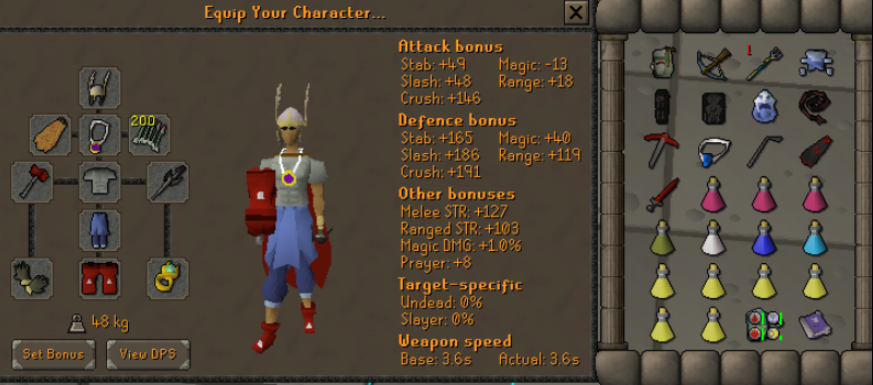
Acceptable sidegrades/downgrades:
• Blood moon for melee gear • Eclipse armor for range gear • Atlatl + darts • Dragon defender • Berserker ring/Ring of shadow/Brimstone ring • Ahrims/Mystics/Infinity/Bloodbark • BGS instead of warhammer • Climbing boot/mixed hide boot • Rune pickaxe • Best stab weapon (vasa only) • Warped Sceptre (not ideal) • Zombie Axe (train slayer)
Notes:
Your drop chance in chambers is mainly increased by damage dealt. In higher scales, Ruby bolts (e) can really help carry your contribution in many parts of the raid. This isn't as relevant in traditional smaller scales. The most points in the raid comes from damage dealt to OLM. Most strategies of chambers revolve around getting to Olm as fast as possible, and/or increasing olm's HP. On death, you lose 40% of your personal points, or 5% of the teams points (whatever is higher) In other words, click the food.
• You should average a purple every 867,000 personal points - kc isn't super relevant.
• Drop chance for a purple in a single raid is capped at 65.7% (570,000 points) - additional points will start to count for a second purple roll
Defence:
• Tekton has 205 defence
• Olm's melee hand can be reduced by 175 defence
• Olm's head is fully reduced after 6 ralos hits
🩸 Theatre of Blood 🩸
These setups will be primarily focused on learners taking on the MDPS (melee DPS) or RDPS (ranged dps) roles. They are the least demanding roles for gear requirements and learning. This just means that you will not be Freezing crabs at maiden, and you will be hitting either the white crabs (MDPS) or green crabs (RDPS) at Nylocasts.
MAIN REQUIREMENTS:
• 90+ Att/Str/Def/Range (94 Mage for Frz roles which won't be taught initially in learner raids)
• DWH (highly preffered) and/or BGS
• Your best slash weapon (4t preffered)
• Your best Ranged DPS on 0 Defense (Think blowpipe/msb(i)/Atlatl/elite void ranged/sunlight crossbow)
• A dual hitting weapon or 3T melee weapon for melee nylo (MDPS)
• Your best Melee DPS spec weapon (Priority order: Dragon claws and chally, then Burning claws, then Voidwaker, then DDS)
• Multiple Salve Amulet (e) you're willing to drop after bloat for inventory space
• A charged Magic weapon to help at nylo/hit nylo boss with
• Thralls
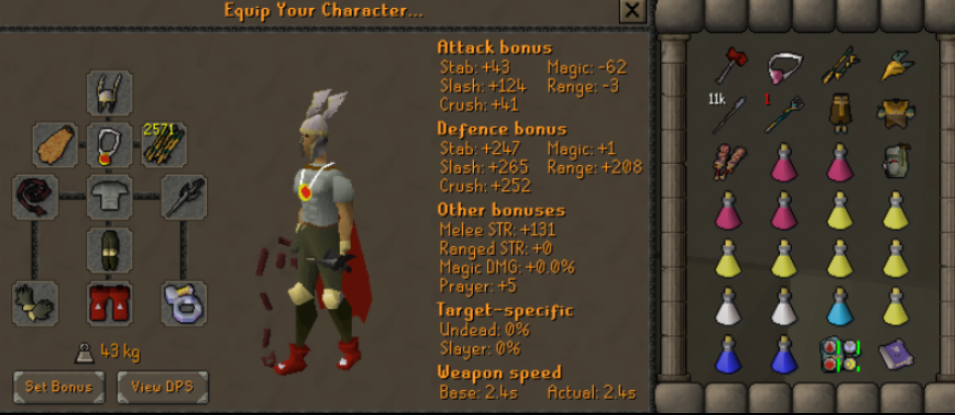
Non-Void Example "Minimum" set-up:
Elite Void Example "Minimum" set-up:
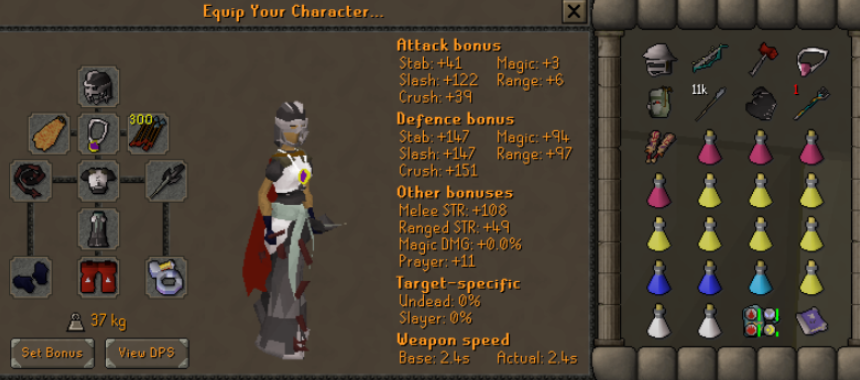
Acceptable Sidegrades/Downgrades:
• Dragon defender • Any strength gear • Dragon halberd • Warped Sceptre • Msb (i)/Atlatl/Hunters Sunlight Crossbow/Blowpipe • Other range str gear MDPS nylo tier list: • Full blood moon dual maccas - dual maccas - sulphur blades=swift blade temotli - ham joint - goblin paint cannon -whip smack
Notes:
Unlike other raids, your purple chance is mainly influenced by NOT DYING. In each room, you gain chances of a drop by surviving and being the room MVP. You begin a 4-man raid with a default score of 18/32. Each death you have reduces your score by 4. MVPing a room increases your score by varied amounts:
• Maiden: +2 • Bloat: +2 • Nylo: +1 • Sote: +1 • Xarpus: +2 • Verzik (P1): +2 • Verzik (P2): +2 • Verzik (P3): +2
There are 86 total points to get in a 4 man tob. Each player's 18 points for not dying, and the 14 various points spread out to the MVP's of each room. As you can see, by just surviving the raid every time, your drop chance will be just fine.
In a deathless 4 man TOB, the teams chance of seeing a purple is 10.99%. If you do literally 0 damage but live every room, your personal chance of a purple is 2.30%.
Defence:
• Maiden has 200 defence
• Bloat has 100 defence (all damage dealt while he is walking is halved, but a 20 bgs would still drain 40)
• Nylo boss has 50 defence
• Soteseg needs to be hit by 2 hammers a phase
• Xarpus has 250 defence
• Verzik's defense cannot be drained
Freezing at maiden:
When freezing the following magic bonuses will be needed to have 100% accuracy on the crabs (99 mage is assumed):
• No augury and no imbued heart: Elite void mage: 76 / Ancest: 140
• Augury on: Elite void mage: 52 / Ancest: 103
• Imbued heart and no augury: Elite void mage: 66 / Ancest 123
• Imbued heart + augury: Elite void mage: 41 / Ancest: 88
🐫 Tombs of Amascut 🐫
These setups will be aimed at completing your first 150 invocation level TOA's. There are many different invocations and setups for TOA so for now I will focus on introducing you to the basic mechanics of the room and some popular invocation choices.
MAIN REQUIREMENTS:
• Around 75+ Att/Str/Def/Range/Mage
• Your best STAB weapon
• Your best Ranged DPS weapon + gear
•A charged Magic Staff + Mage gear
• Thralls
• Keris
• BGS - Bone dagger
TRUE Minimum Set-up:
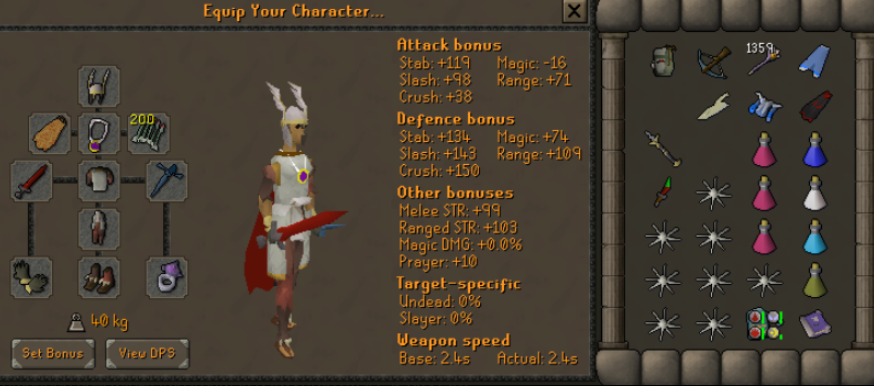
My recommended new mid-game ironman minimum path setup (maccas on stab):
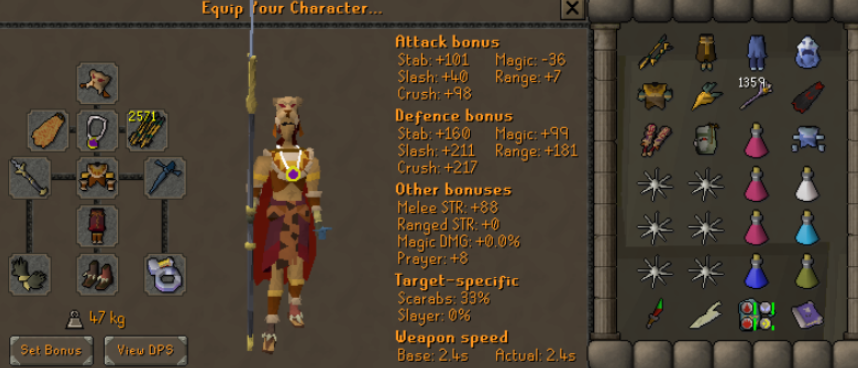
Stab weapon tier list:
Fang - Black gem keris - Rapier - Saeldor Hasta/Nally - Voidwaker Abyssal Dagger DHL - Full blood-moon Maccas - Dragon sword Leaf-bladed sword == Maccas
Ranged weapon tier list:
Tbow + Blowpipe - Bowfa ZCB - Best crossbow Atlatl (Atlatl is great on low defense, and falls off quickly at higher defense)
Notes:
• In team raids Ruby bolts (e) can do a lot of work in TOA with the high HP of all the bosses you range. Drop chance is calculated by contribution, so if you struggle in the raid, each ruby proc can really help you out. The rcb is easier to use than the atlatl, and is much better to use when you're brewed down, or making mistakes. The most valuable time to get points in TOA is P3 warden, where a ruby bolt proc can really help boost some points for you. A lot of these points are not as relevant in a solo, where I would personally prefer using the atlatl.
• Toa droprates scale exponentially with invocation level. A general rule of thumb is, no matter how much longer it takes, it is worth it to push the invocation level as high as you can without dying.
• Warped scepter is acceptable for a 150, but quickly becomes quite trash. A trident upgrade is huge here.
• Bone claws and voidwaker are great DPS spec weapons
• The higher the invocation, the more important getting yourself an upgraded stab weapon becomes. Boss defense increases a lot with Raid level.
• The blue keris upgrade is great at kephri pre-fang, and the yellow keris upgrade is great for completing higher level TOAs. The Red Keris is mostly only used for large team speeds. The black keris is pre-bis before fang
• You're likely going to use your best ranged dps on the Wardens P1/P3 (the final room) until shadow. A fang upgrade can also edge out some lower tier ranged options.
Defence:
• Most bosses can only be reduced by a small amount and are quite resistant to crush- making the bone dagger and BGS much more effective for defensive reduction.
• Ba-ba's defence can be reduced by 20.
• Kephri's defence can be reduced by 20.
• Akkha regains any defense drains quickly (Not worth)
• Zebak's defence can be reduced by 20.
• P1 pillar's defence can be reduced by 40.
• P3 Warden's defence can be reduced by 30.
• P4 Enraged Warden regains all previously drained defence, and can then be reduced by 60.